

The Steam Deck is like a dream come true; a capable gaming PC in handheld format for an affordable price, support for Steam and a highly optimized Linux distribution at it’s backend. This article talks about my experience in the first week of usage and includes a few tips and setup tutorials.
It feels almost surreal to me. I got the Steam Deck since almost two weeks now, but started diving into it for one week (was busy with a project, unlucky timing). So my experience is highly limited. Remember when you are reading old reviews about the Deck, that Valve is improving Steam OS and Steam client constantly and therefore these articles are outdated. I hope my first insight about this system can be useful for anyone with PC experience, from the perspective of a long running desktop Linux user. Think of it as a much smaller laptop in handheld format dedicated for gaming.
The Steam Deck
is like
a dream come true
Why did I buy this device in the first place? I do not play much on the go and already own a gaming PC, let alone want to build a new one soon. So it may sound like wasted time and money first. But being able to play light games not only on my desk, but also on my bed or the couch is refreshing. The additional possibility to bring it to friends and showing off to family has a certain cool factor. Valve recently announced that the wait queue for reserving is no longer needed and you can buy it straight on the official Steam website. Now it’s the best time ever getting into! I purchased one with Steam Wallet by redeeming gift cards only, no credit cards or a bank account are needed at all.
Hardware
My choice is the mid-tier model with 256 GB SSD internal storage for 549 Euros in Germany. That is enough for many indie games and emulators, but won’t be when installing too many bigger games.
Storage

I’ve added a 512 GB micro SD card for 45 Euros, to extend the storage capacity. If you do the same, then look for the labels “U3” and “V30” and “A2” (or at least “A1”) when buying a micro SD card. These specifications ensure that they are well suited for use cases like these. When initially installing the card, it didn’t want click into it’s position on the slot. Got a bit worried, but then it magically clicked in after a few tries. After that I taped the slot over with some black tape to protect the card and slot, but mostly to hide it visually.
Ergonomics
Holding the device in my hands feel surprisingly good. It feels lighter and smaller than what I was expecting after watching close up videos on my big monitor. There is definitely a weight to it, which can be tiring after long plays sessions. Usually I support my arms or elbows with resting on my body in example. My hands have a good hold of the device, it feels just right and comfortable.
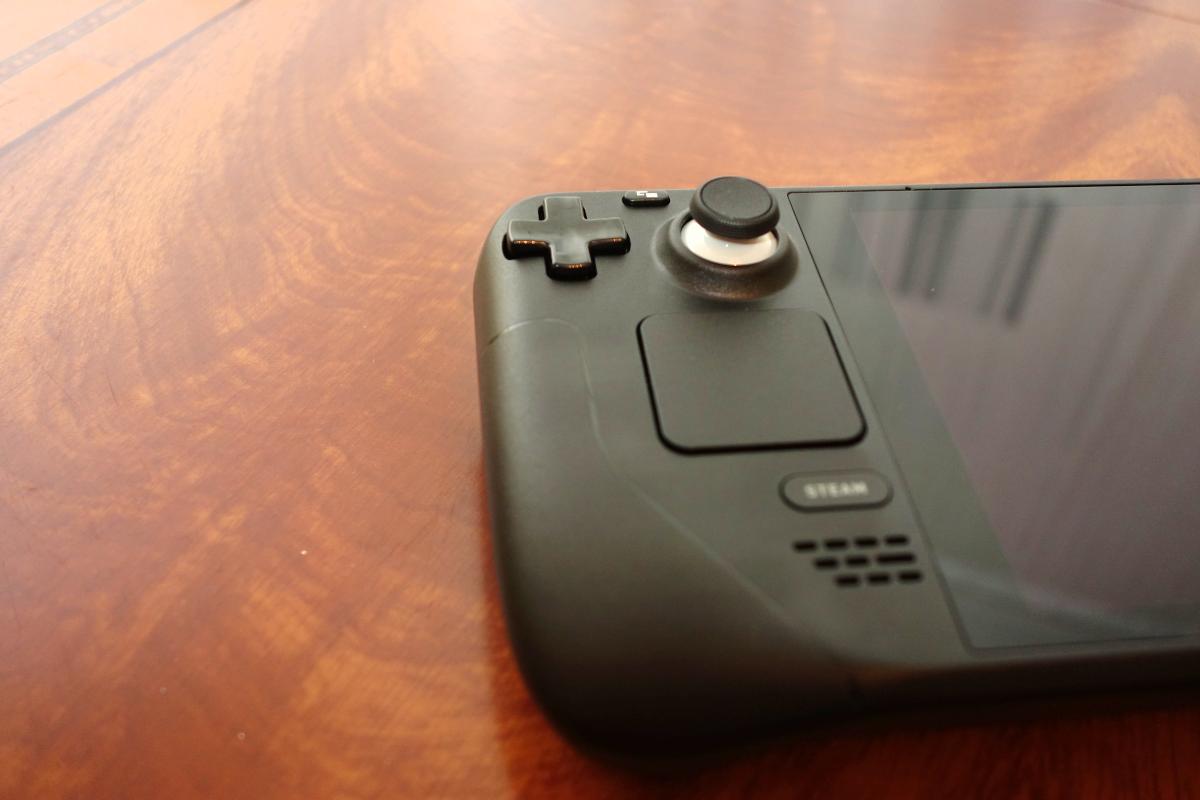
The d-pad is important to me and I am happy being able to report that it is just fine. This underwhelming sounding report is actually a relief and compliment, because most companies doesn’t do it right. A little nitpick is, it could have been a little bit more tight and maybe bigger, but it is fine as it is. The thumb sticks seems to be perfect, no complaints.
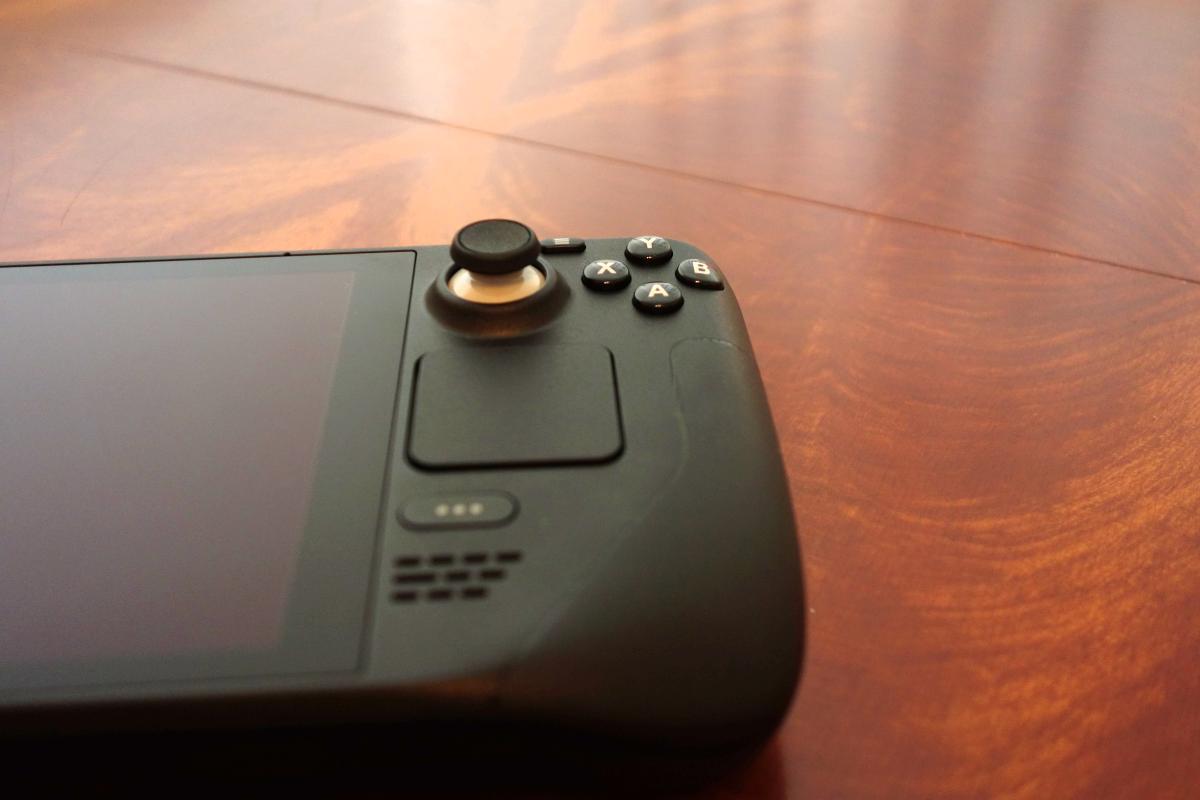
The 4 face buttons on the right side are good to reach, but for my taste a little bit too small. My biggest complain are the L1 and R1 bumper buttons on the top side of the Deck. Some games require them as main buttons and my natural holding position of the device makes them uncomfortable to use in my hands. My index finger is on the L2/R2 triggers, which just feels right to hold for longer period of time in my opinion.
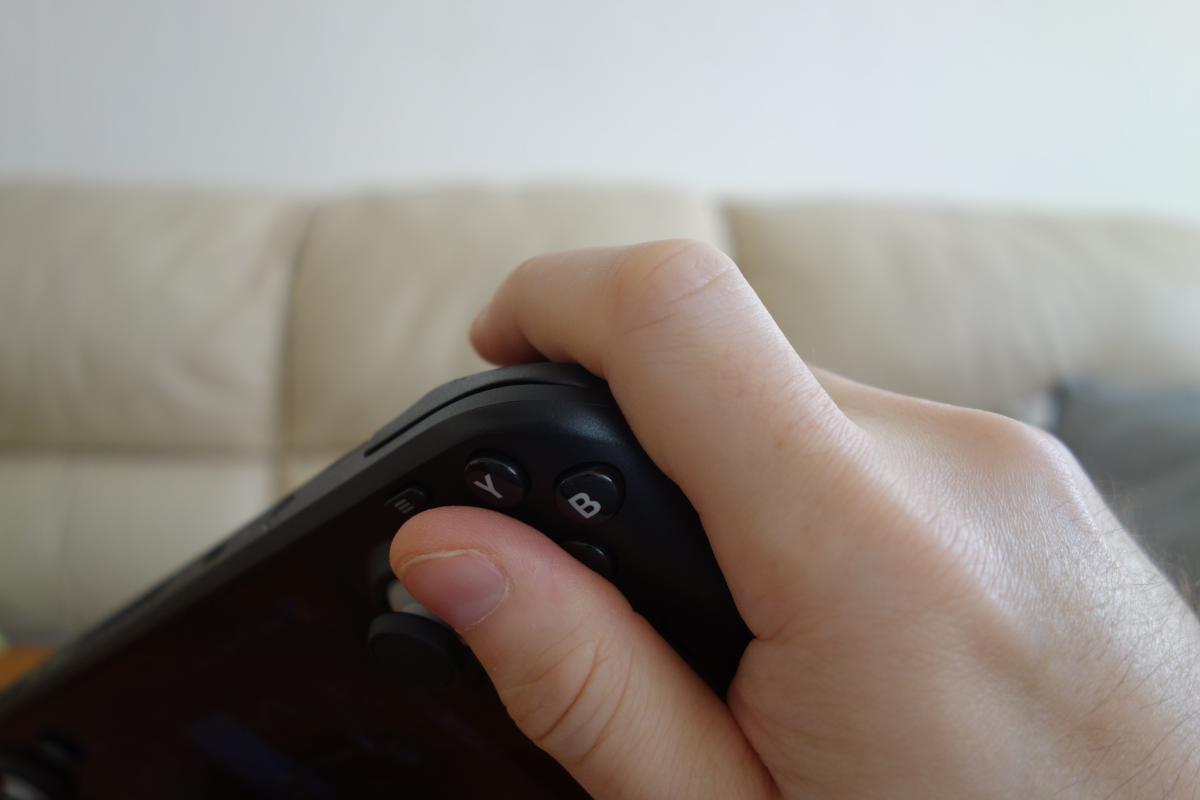

Right image: Resting index finger on R1 for longer period of time feels uncomfortable
The 4 back pedals on the back of the device are a nice touch and useful for certain games. I clicked on them a few times by accident and probably need to get accustomed to them. Touchpad and Trackpads are very useful on desktop mode, but didn’t use them for gaming so far. And at last the speakers are nice. I like playing games with it, nothing to complain.
Battery
The battery is a critical area which can be a problem for AAA games. I have no data to share, but my gut feeling and experience so far playing bigger games seem to last only a few hours at max. Optimizing settings can help here. However playing handheld systems on RetroArch (meaning emulating Game Boy Color in example) with optimized Steam Deck settings will last you many hours. So it highly depends on your settings and the games you are playing, obviously. Just know that either you can expect short battery lifetime or may need some time for tinkering to extend it a bit.
Important note: Playing on the Deck while connected to the charger at the same time will directly power your current play session. That means that the battery is not discharged and charged at the same time, which is good for the health of the battery. So you can in good conscience play longer sessions while using the wall charger. And there is another effect to help with the health of the battery. When charging, it will stop charging once reaching 100%. Steam Deck allows for discharging the battery, even when connected to the charger, up to a point of 90% and begins charging again. This helps to avoid a cycle of little charging and discharging the battery. Keep that in mind when finding your Deck at 92% after leaving it on the charger for the entire night.
Suspend
(Technically, this isn’t a hardware feature. But… nobody will notice. Don’t tell anyone!)
There is a functionality I didn’t think too much about it before, because I thought it is the same as on my PC. You see, on the Nintendo handhelds you can often click a button to suspend your device into sleep mode. This saves battery until you are ready to dive into it back. Valve implemented and tested a similar feature. When you click the “Power”-button once, the device goes instantly into sleep mode. Click again and it will wake up. Simple, huh? And it works mid game too, so you do not have to find the game in the library, run it and wait all the intro sequences and so on. I tried it a few times and it seems to work fine. Obviously this is not meant to be used with Online games, so you cannot turn the entire internet into sleep mode. Overall a pretty useful feature.
Deck’s biggest Fan
I have no problem with the way the fan sounds. There is no whine or high pitch and it is inaudible for the most part. It can be annoying at times when it gets louder and sometimes the fan seems to have it’s own life. Spinning up for a few seconds and down and repeat this in short period of time is annoying. Usually I end up going into the System settings found under “Steam”-button > “Settings”-menu > “System”-tab. Scroll down the list to the bottom and tick off “Enable updated fan control” for a few seconds and then enable it again. This seems to solve the repeated spinning up and down issue until it hits again.
The physical area on left and right side of the Deck where you hold never got hot or particularly warm. No matter how hard the Deck tries, it will never get uncomfortable warm. That is some excellent heat isolation from the controller area.
User Interface
The UI got an uplift from the aging Steam client on desktop PC. It is much better suited for this kind of use case. There are dedicated buttons on the sides to bring up a general Steam menu or Quick Settings menu. In the HOME view of Steam you are greeted with recent games list and what’s new update notes. Good for quickly getting into the games you was playing previously.
Library
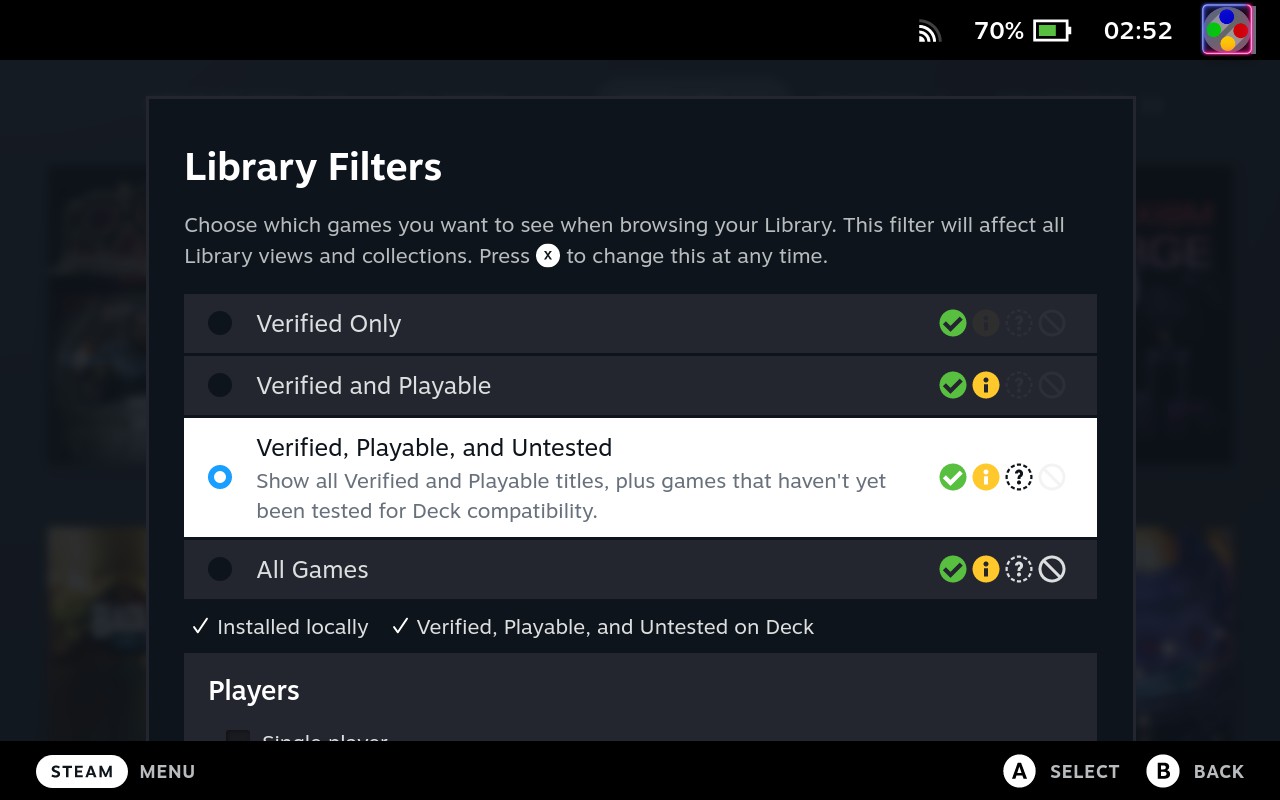
Browsing your library of games is straight forward. There are sub categories such as INSTALLED and COLLECTIONS to cycle through with the L1 and R1 shoulder buttons. Furthermore a simple Filter can be enabled at any time. Limit the view to show supported games only or go into the advanced options to filter by genre or tags in example. And if you like the filtered view, save the results as a Dynamic Collection. Powerful and easy to use.
Settings
The area to setup basic settings for your Deck and check or install updates, have a quick overview of the storage and much more. Here are a few things I did after the usual suspects (such as language selection, setting up internet connection and showing time in “24 hour clock” format):
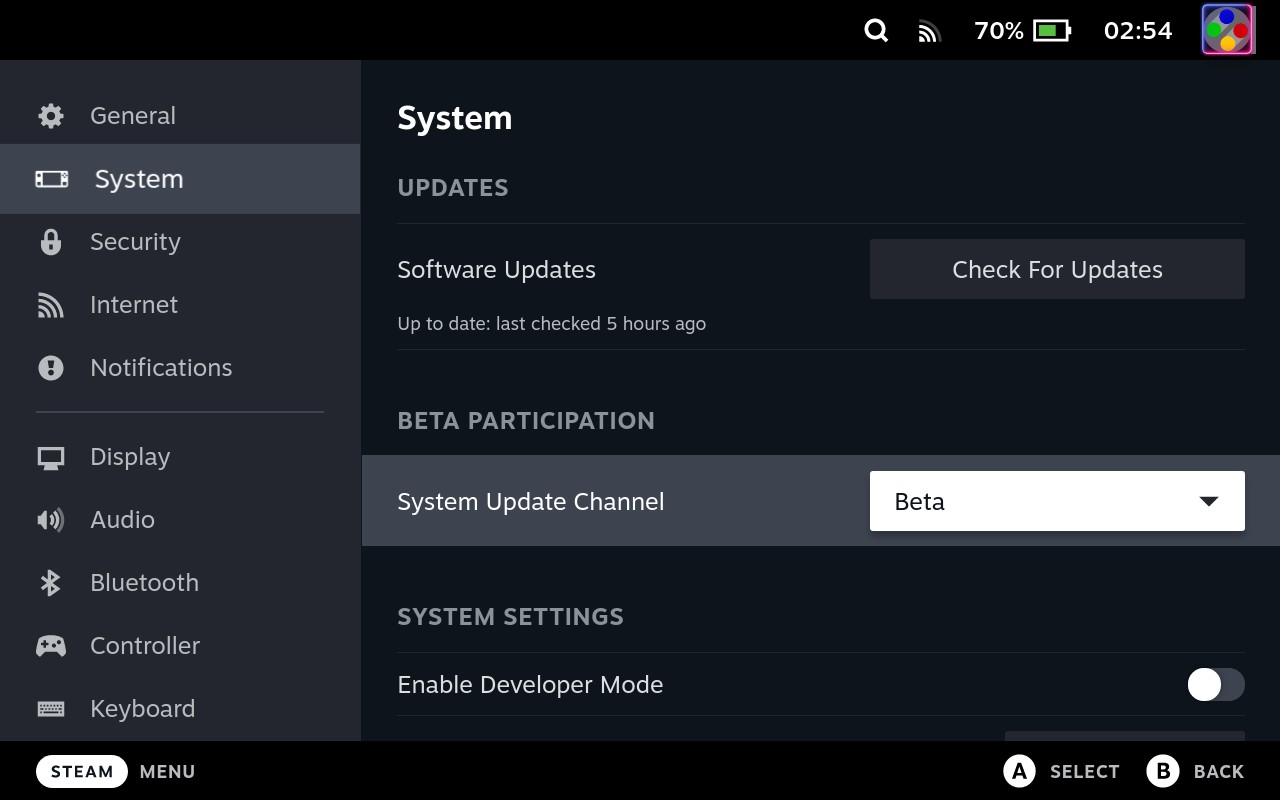
- System: If you want get new updates and features faster than most other users, then set the “System Update Channel” to “Beta”. This comes with a little higher risk of breaking stuff or introducing bugs, because it is less tested than the “Stable” branch. If you want the most stable system, then don’t change it.
- System: If you have inserted a micro SD card to your Steam Deck, then you might want to “Format SD Card”. ATTENTION! This will delete all data on the micro SD card and optimize it for use with the Steam Deck. That also means the card will no longer be readable by your Windows system (if you have any). Only do this if you are okay with losing all data on the micro SD card.
- Notifications: I don’t like getting distracted. Both options “Disable non-critical notifications” and “Hide non-critical notifications when in game” are set, so these do not annoy me. I also disable Friend Notifications “When a friend joins a game” and “When a friend comes online”.
- Display: Set a lower “Brightness” level, so the battery last longer. However this is a tradeoff. Lower Brightness means more reflection will be seen on the screen and it gets darker, but in turn you can play longer before charging the battery again.
- Audio: Not sure if the default setting was on or off. I always find the UI sound effects of any platform annoying and is one of the first things to turn off. Toggle “Enable UI sounds” to off.
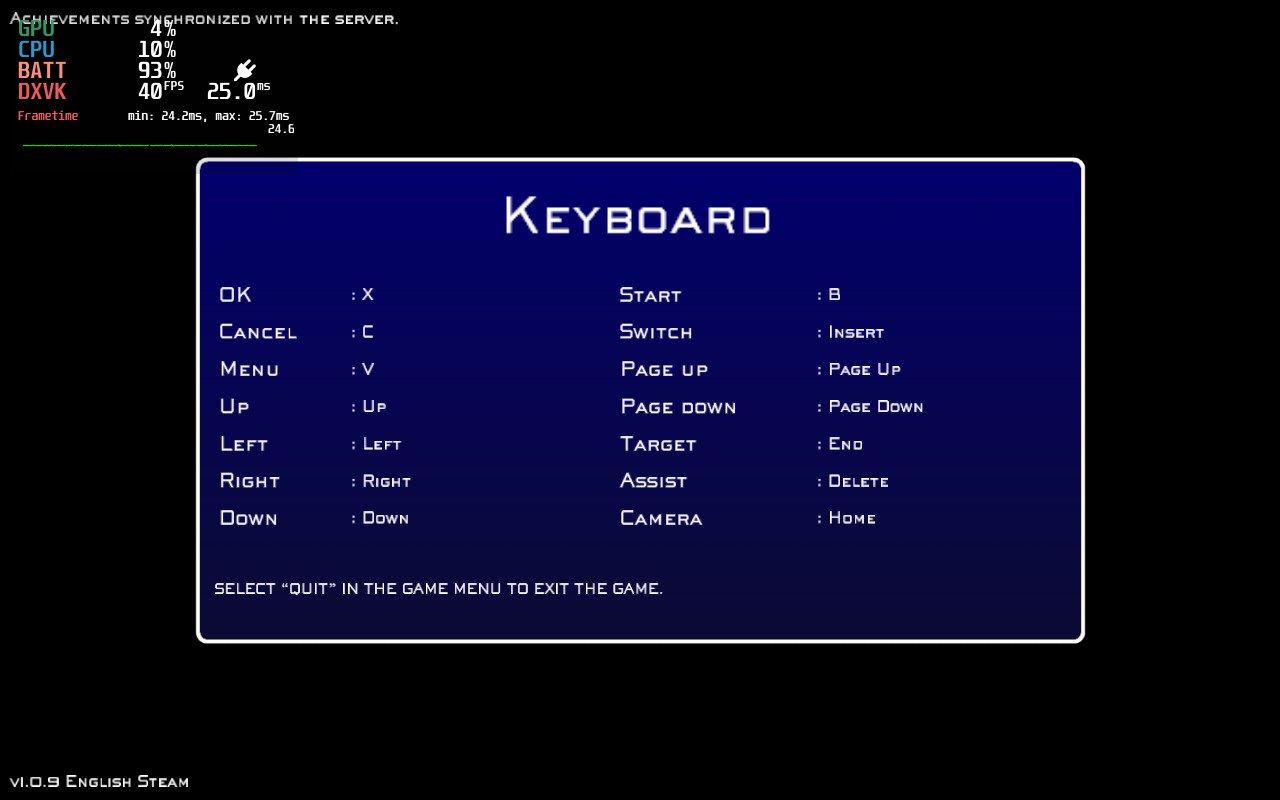
- Keyboard: I have changed the “Trackpad Sensitivity” from “1.0x” to “1.5x”. It should feel a little bit faster and more snappy when typing. This is an ongoing investigation, so no final conclusion on this yet. The built-in virtual keyboard can be brought up any time by holding “Steam”-button and pressing “X”-button. This also supports typing with the two “Trackpads”. Play around with the sensitivity setting and bring up the keyboard to test it right away.
- Downloads: When Steam is downloading something, then it should not slowdown my entire internet at home. That is why I always setup a “Limit bandwidth”. To get the desired value, you need to do some math. As an example my desired limit is “5” MB/s, which is 5 Mega Bytes per second. In the tab I have to type in the value “40,000” (without comma), to get 40 Kilo Bits per second. Note the difference of “Bytes” and “Bits”. Now
8/40000 = 5000, meaning “5000 Kilo Bytes = 5 Mega Bytes”. - Storage: In this tab you can not only view the largest games on your device, but also specify where each new game should be downloaded and installed to. Mine is set to micro SD card. A “star” symbol marks the current default location.
Quick Settings
To access Quick Settings, press the right physical button on your Steam Deck with text “…”. Here you can see a list of your current Notifications and quickly enable or disable certain settings such as Bluetooth or adjust Brightness. To me the most important category here is “Performance” tab. These are global settings used by your Deck and any game that runs. While running a game, you can save game specific overrides by enabling the option “Use per-game profile” set to on. Here are my default settings:
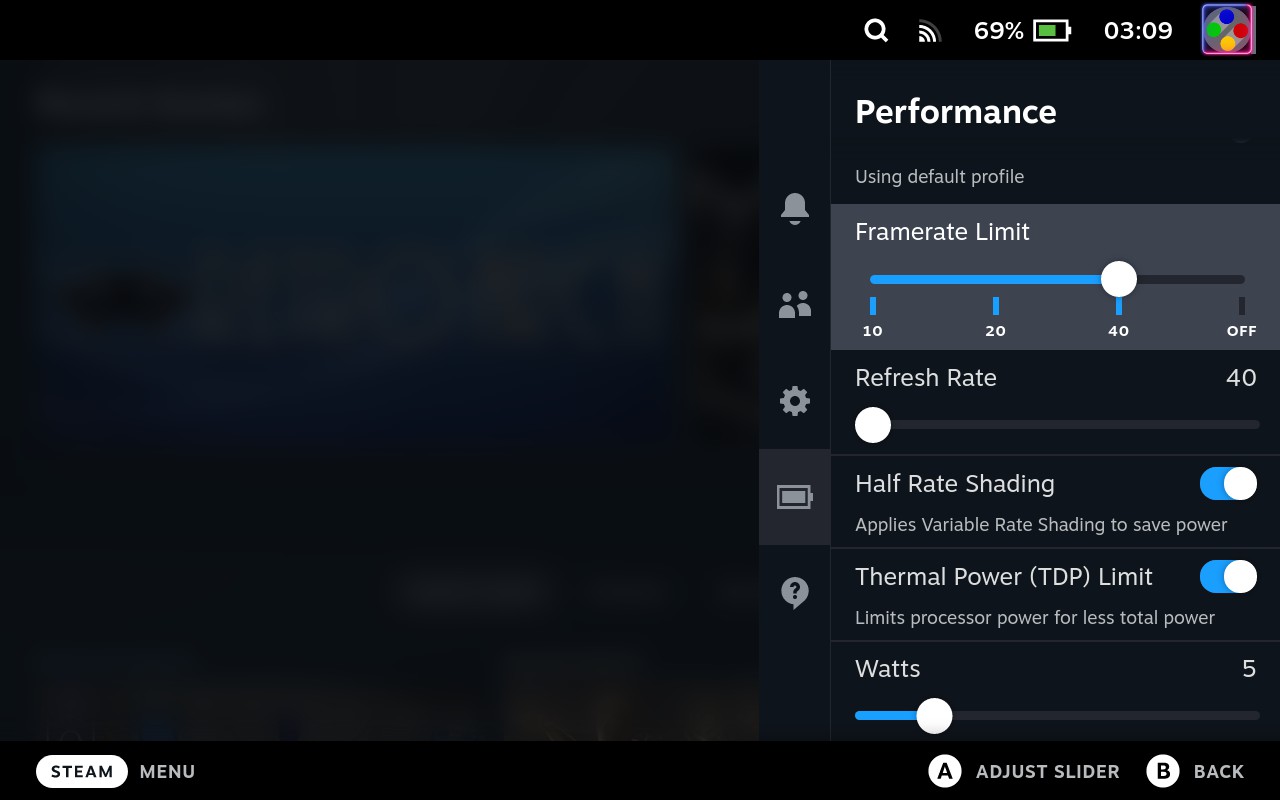
- Frame Limit and Refresh Rate are set to “40”. This is a good middle ground for most games that do not require higher FPS. But certain games can feel sluggish and so you need to do a game specific override. In example certain fighting games are locked to 60 FPS and are unplayable with lower frames per second setting.
- Half Rate Shading is something I am still exploring. This is set to on, so it will use up less of my battery by delivering a little bit worse image quality. On the small screen it might be a good tradeoff, but would make no sense if plugged to charger and playing docked on a big screen.
- Thermal Power (TDP) Limit can be used to control how much power the CPU can consume at most. Normally this is rated to go up as much as 15 Watts. I enabled this option and set the slider to “5” Watts. This value is quite low and you definetely need to set it higher for specific games. Some older and indie games work with “3” Watts too.
- Manual GPU Clock Control is similar to previous setting. It controls how fast the graphics unit operate. Lowering the setting will obviously help with battery life, but may introduce stutter or make games entirely unplayable. So this is a setting I leave it at default off and control it per game specific only. Tried it with indie games and emulation by setting it to “300”, which is really low.
- Scaling Filter is something I am still exploring and have no conclusion yet. If the game resolution you play is different from your screen resolution of 1280×800, then the content will be up- or downscaled to fit to your screen. The values “Linear” and “Nearest” are two simple ways of fitting to screen. “Integer” will only size the game image to screen without uneven pixel sizes and can end up smaller with black bars in example. “FSR” on the other hand will also upscale the image to fit to your screen, similar to the other settings. But You can set your ingame screen resolution to a lower setting such as 960×540 in example. This means the game plays at lower resolution and gives you higher performance, while fitting to the screen and still looking not too pixelated, thanks to “FSR”.
If you have low default settings and forget to change per game basis by enabling game specific settings, then for certain bigger games it might be a bad experience. I sure did forgot this when trying out Mortal Kombat X and was frustrated first.
Shortcuts and Screenshots
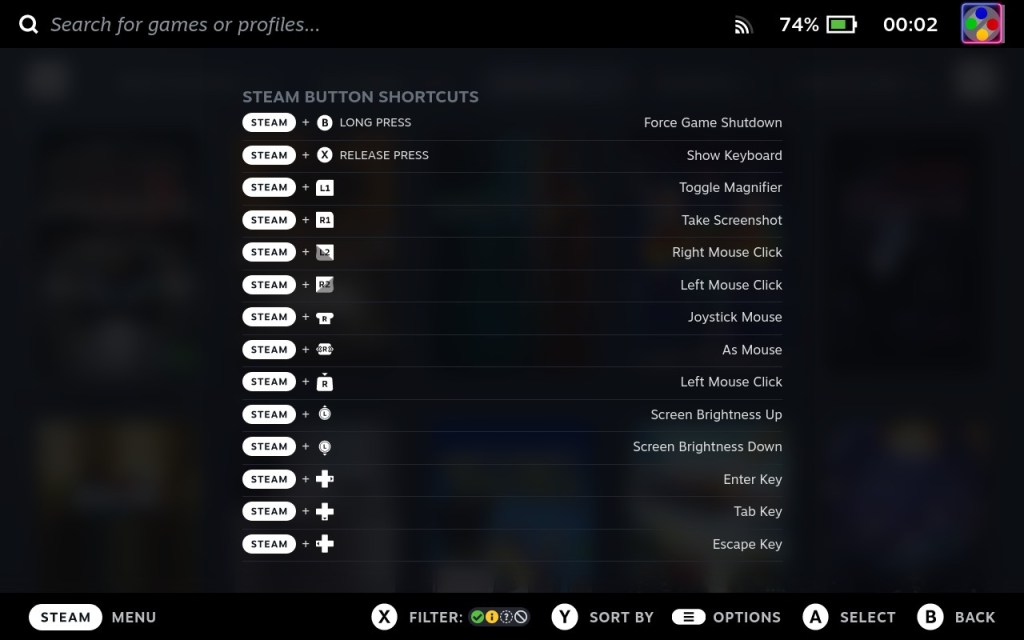
The Steam Deck also comes with a set of system shortcuts, that can be used in Game Mode (the default Steam Deck handheld UI). To list all of them, hold the “Steam”-button down for 2 seconds:
Screenshots of the Deck UI in this article are done through “Take Screenshot” functionality by holding “Steam”-button and pressing “R1”. Unfortunately this shortcut key does not work in Desktop mode. You can view, delete and upload the images from menu “Steam”-button > “Media”-menu. All of these UI screenshots are saved in a subfolder of “/home/deck/.local/share/Steam/userdata/”. You just need to find which one, but it is a subfolder named “screenshot”. On my PC I used a search tool to find it and it’s “/home/deck/.local/share/Steam/userdata/125416325/760/remote/7/screenshots” on my system. So good luck.
Desktop mode
The Steam Deck also comes with a Desktop mode, which is a Windows PC like operational mode, as opposed to the game controller driven Steam handheld UI. After all, this is a full fletched Linux operating system based on Archlinux. You can even use mouse and keyboard and install any application (in example GIMP) and do whatever the hell you want. This is part of the Deck appeal, because there is no locked down wallet garden. You can even install competing platforms to buy and play games other than Steam.
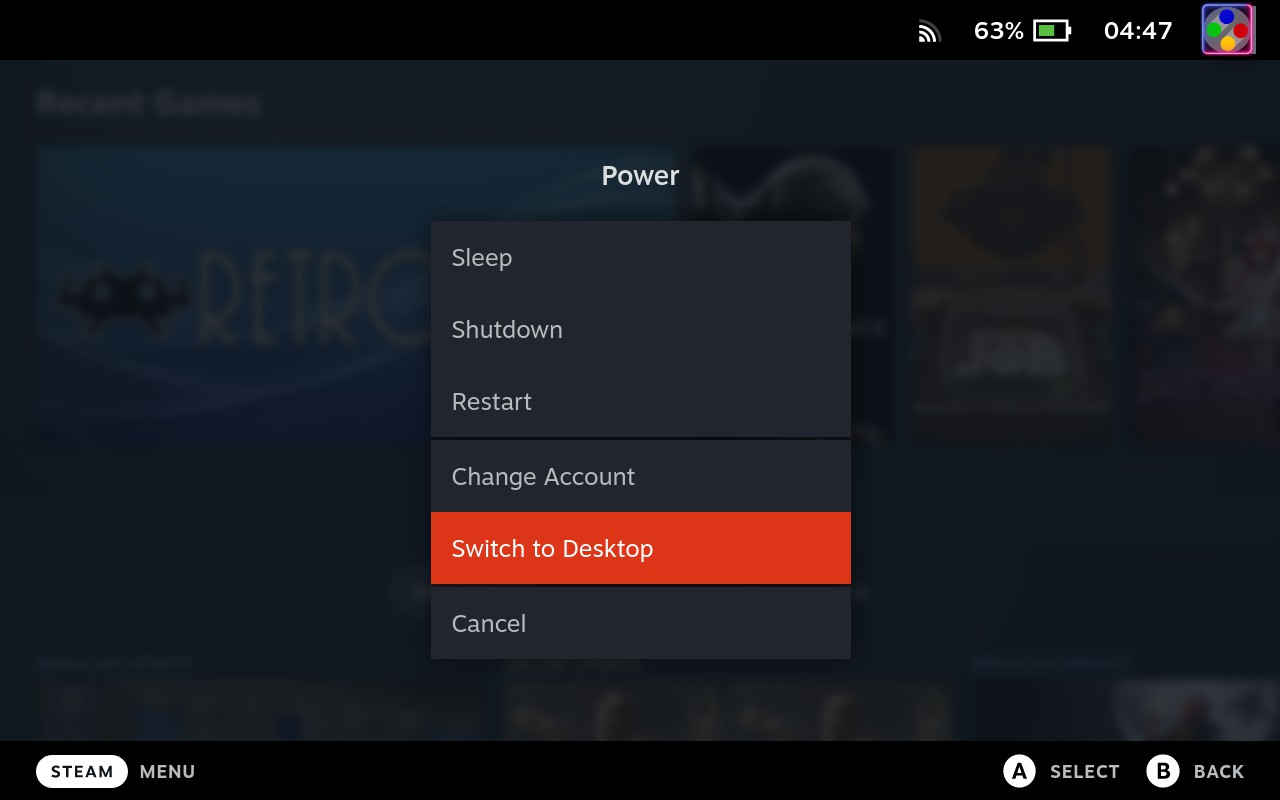
To access Desktop mode, either hold down the physical “Power”-button or press “Steam”-button and then select “Power” menu. In the following popup menu choose “Switch to Desktop” and a few seconds later you have a full PC in your hands.
However there are limitations. The filesystem for the main OS installation is read only and protected by default, but you can disable the protection. Any changes to it will be reverted back with next update. Don’t worry, because settings, the home section and micro SD card are completely free and persistent. Plus installing applications with the “Discover” app are permanent and not affected by this protection system either.
Using right Trackpad for mouse navigation and “R2” as a left mouse click works, but this is a bit wonky in my experience. Left Trackpad is for scrolling. Definitely not an entire replacement for a mouse, if you want to use Desktop mode for longer period of time. Also the virtual keyboard to type commands and longer text is not ideal either. But these functionalities do what they need to do and are okay for quick stuff here and there, without bringing up physical mouse and keyboard on the go.
Screenshots
To take screenshots while in Desktop mode, the previously discussed shortcut does not work here. You can use the program “Spectacle” that comes at default. After taking the screenshot, don’t forget to save the file to disk. The standard location when “Save as…” is at “/home/deck/Pictures”, but you can choose any folder to save to.
Don’t sleep on this one
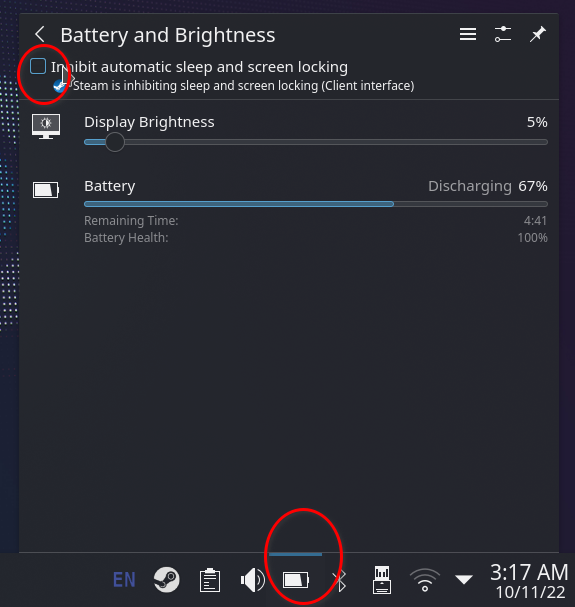
Sometimes a task requires a little bit longer time to complete. When leaving the Deck untouched for a while, it will enter into sleep state to save battery usage. To prevent this from happening, look at the bottom tray area with “Battery”-icon. Left click on it with mouse (or “R2”-button) to bring up a menu named “Battery and Brightness”. On top of the menu you can see the option “Inhibit automatic sleep and screen locking”. Click that for toggling it ON, to prevent the device going into sleep mode. I need that when copying large amount of files over network, which is our next topic.
File Transfer
This is an area where I had to figure out, as it was not straight forward. I will not remove the micro SD card each time when needed to read or write data on it. Naturally the cable route would be the solution. Unfortunately that is out of question too, because Steam Deck does not support the “MTP” standard to access files and folders of your device through USB connection. And when I discovered that sharing a folder with SMB from my Steam Deck does not work either (but accessing SMB folder shared on my PC works), I got a little bit nervous. However there is a popular application called “Warpinator” (Warpinator on Windows tutorial), which can transfer files and folders across both devices. Just install it on both systems. But I wanted direct access to folders for additional stuff, not just sending files.
SSH / SFTP
And there it is: SSH/SFTP. After setting it up, I could connect my PCs filemanager and terminal to the Decks folder structure and access every file. Only problem to me is, that file transfer speeds are a bit slower and for whatever reason my terminal connection is laggy. Using Warpinator on large file transfers is still useful. Here is how I setup SSH/SFTP connection with my PC:
Whenever you need to type anything and don't have a physical keyboard available by hand, hold down "Steam"-button and press "X" to bring the virtual keyboard up.
Steam Deck
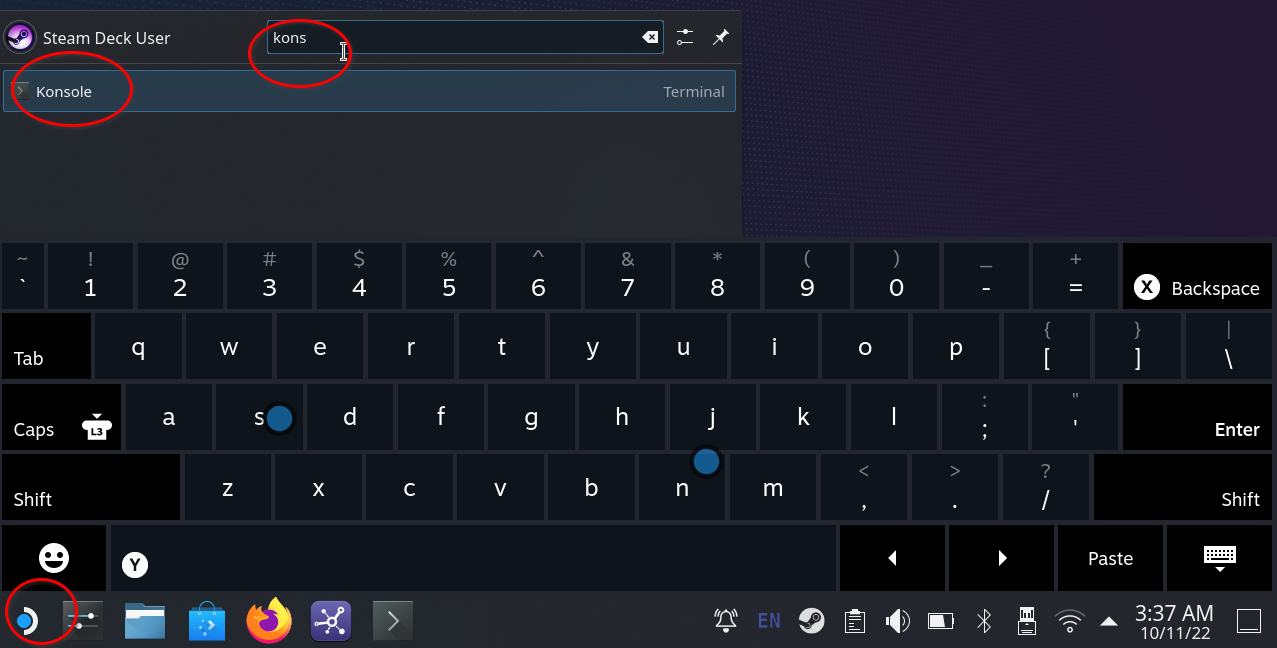
- On your Steam Deck, Enter Desktop mode.
- Click “Start” menu on the left bottom side to bring up applications menu. In the search field type in “Konsole”.
- Now open this application named “Konsole” to enter commands.
- Type in this command:
passwdand press “R2” or Enter to execute the command. You will be asked to enter a password that is created now. Don’t forget the password. - Activate SSH by entering and executing following command:
sudo systemctl enable sshd
You can access your Steam Deck remotely from a different PC with ssh deck@steamdeck in example. I will describe and show how to set this up on my Manjaro Linux PC with the same filemanager and terminal as on Steam Deck. Note: The provided screenshots by me are themed (long live gruvbox), so apologies for the different and unfamiliar look.
Desktop PC (Manjaro Linux)
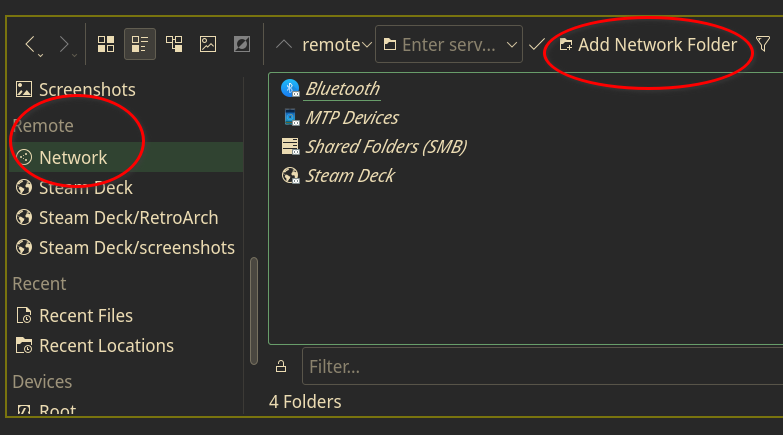
- Open the filemanager “Dolphin” (not the emulator, this is a filemanager just sharing same name).
- Open virtual folder with the networks.
- Click “Add network folder” and choose “Secure Shell (ssh)” in the menu.
- Next fill up with these settings:
- Name:
Steam Deck(Note: This is a custom name you can choose.) - User:
deck - Server:
steamdeck - Port:
22 - Protocoll:
SFTP - Folder:
/home(Note: This is the entry point you want connect to, all subfolders of this folder are then accessible.) - Coding:
Unicode ( UTF-8 )
- Name:
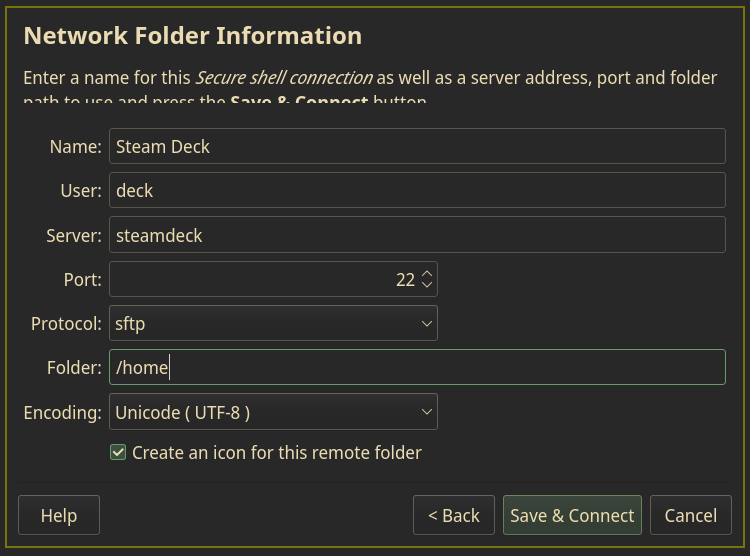
Now hit “Save & Connect” while your Steam Deck is on and connected to the same home network (wlan). Another common entry point is
- Folder:
/run/media/mmcblk0p1/steamapps/common/
to access Steam games folder on your micro SD card. Although check if this path is different for you. I am currently not sure if the part mmcblk0p1 is actually the same for everyone.
Update (2024): If this does not work, then try the Protocol: fish . I am not exactly sure what this is and why it works, but on my recently new installed EndeavourOS this was required, as it did not work with sftp in Dolphin filemanager. So keep this in mind.
Connect with Thunar instead
I recently switched my operating system and applications. In case you are using Endeavour OS and the filemanager Thunar, then you can easily connect with SFTP too. Make sure the packages gvfs sshfs are installed. In the address bar of Thunar, type in sftp://deck@steamdeck/:22 and enter. Type in your password (the previous setup one). Now you have access to your Steam Deck filesystem.
Create a bookmark, so you don’t need to type the path every time you want to connect. Also go to the folder /run/media/mmcblk0p1/steamapps/common/RetroArch and make a bookmark for this too.
Startup video

Do you want the Valve guy from Portal 2 startup intro as a Steam Deck startup video? Remember the creepy guy turning halfway back? You can setup this video animation to be played every time your Steam Deck boots. Obviously this can be done with any other video too, but it has to be converted into the correct format and has to be saved in a specific folder with a specific filename.
Here is a simple step by step tutorial:
- Download the correctly encoded and named video file: https://archive.org/download/deck_startup/deck_startup.webm
- In your Steam Deck, go into directory
~/.steam/root/config/and create a folderuioverrides, go inside of it and create another foldermovies. - Put the downloaded video file
deck_startup.webmin the newly created folder at~/.steam/root/config/uioverrides/movies/.
That’s it. Restart and enjoy.
Suggested script for automated installation to run it on your Steam Deck from Reddit user imdyingfasterthanyou:
STEAM_ROOT="$HOME/.steam/root/config/uioverrides"
mkdir -p "$STEAM_ROOT/movies"
curl -Lo "$STEAM_ROOT/movies/deck_startup.webm" 'https://archive.org/download/deck_startup/deck_startup.webm'
And as a special bonus, I have created a classic Game Boy inspired intro, if you prefer that one: https://archive.org/download/deck_startup_gb/deck_startup.webm
Game Experiences
I’ll describe very shortly my experience with a few Steam games tested so far. Steam Deck compatibility of “Unknown” means that Valve didn’t test and rated the game for the Deck. A “Verified” means the game should work perfectly and is officially approved by Valve. Rating of “Playable” means the game can be played, but there could be some hurdles or little annoyances that would require a bit of tweaking. Often these games play perfectly fine, if you are okay with in example bringing up the virtual keyboard manually or change the default configuration to something usable. ProtonDB is a community effort to collect reports from Linux users. Those ratings range from “Platinum” to “Borked” and are a mixture of old and new reports for PC and Deck.
| Game | Compatibility Ratings | My experience |
|---|---|---|
Deathsmiles |  Verified, Platinum ★ Verified, Platinum ★ | Game works flawlessly out of the box. Had a playthrough to the ending. (Use per-game profile: Framerate=40, Refresh=40, Watts=3, GPU=200) |
SuperTux |  Unknown, Native Unknown, Native | Didn’t experience any issues so far. Played a few stages. (Use per-game profile: Framerate=40, Refresh=40, Watts=3, GPU=200) |
Redout: Enhanced Edition | Verified, Gold | Runs well without configuration, but I optimized a little bit for battery life. For this lowered a few ingame quality settings and enabled V-Sync, so it would sync to 40 Hz screen. (Use per-game profile: Framerate=40, Refresh=40, Watts=7, GPU=uncapped) |
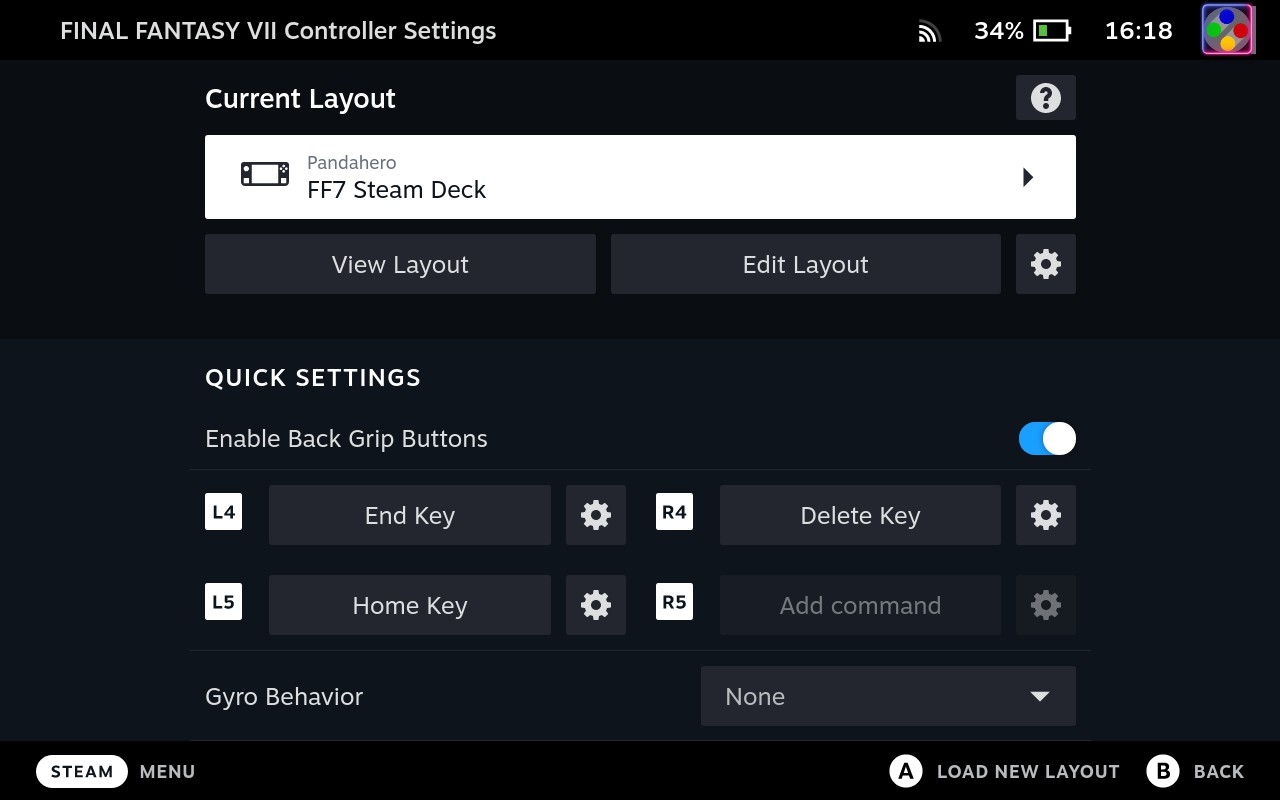
Final Fantasy 7 |  Playable, Platinum Playable, Platinum | Note: This is the non Remake old version of FF7. To start playing the game the touch screen is needed to be used to click “Play” on the launcher. And to bypass the keyboard screen, none of the keys work. A community controller layout needs to be downloaded and set. Click “Steam”-button, go to “Controller settings”, click again and you should be in “Current Layout” view. Tap up once and “A” to load a new layout. Select the “Community Layouts” tab. Find the one from user “Pandehiro”, which is optimized for Deck controls. (Use per-game profile: Framerate=40, Refresh=40, Watts=3, GPU=200) |
Mortal Kombat X | Verified, Gold | Works well with default settings, but had a bit trouble with my custom settings. I have set a few ingame quality settings to low or disabled effects, so I can set the ingame resolution to 960×600 (60 Hz). (Use per-game profile: Framerate=Off, Refresh=60, Watts=7, GPU=700, Scaling=FSR) |
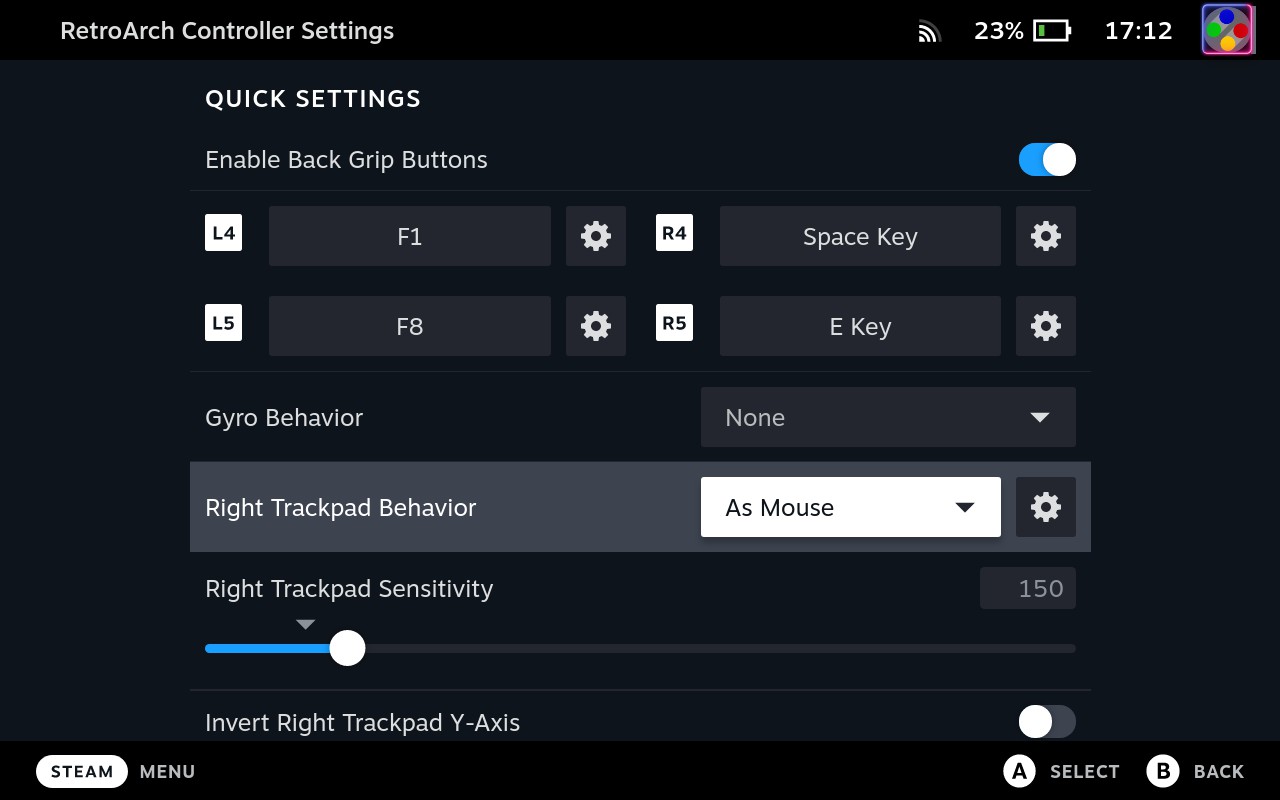
RetroArch | Unknown, Native | No big issues for the most part. I added a few key bindings to the back pedals and set trackpad to be a mouse for systems that use a mouse. Installing a DLC core, setting it up and importing games work as usual. (Use per-game profile: Framerate=Off, Refresh=60, Watts=5, GPU=300) |
Settings of max 3 Watts power consumption for CPU and a fixed GPU cycle at 200 or 300 are very low. This can save you a lot of battery time and you can play games much longer. However, such settings can cause serious performance issues or make them straight unplayable. As an example, Mortal Kombat X worked for me with limit of 7 Watts for CPU. So, to maximize battery life, you need to experiment a little bit and find optimal configuration for each game. I do not claim my settings to be optimal; they are just tested for short playtime.
In a similar note the limiting of Framerate and lower Refresh rate can cause issues too. It is highly game dependent, plus what ingame settings are currently set too. Mortal Kombat X is synced to 60 FPS and limiting to a lower Framerate than this from the Quick Settings menu will cause slow and unplayable gameplay. So you should “uncap”, to allow the game to sync at 60 FPS. Also a lower Refresh rate will cause choppy gameplay on this game too, not as choppy like limiting Framerate, but still not fluid to play. I also reduced ingame resolution and enabled FSR for upscaling from Deck’s Quick Settings.
But for games which allow lower Framerates, both settings can be lowered, mostly “40” is enough. FPS lower than that makes most games unplayable. I can see for certain type of genres the 20 FPS being useful, like text adventures or games focusing to still images. I hope in a future revision of the Steam Deck that the display gets VRR capabilities.
Content recommendations
If you are new to the Deck and need some news or tutorial content, then look no further, look down:
YouTube
Verdict
I was waiting a long time for a device like this and then another long time until I got one into my hands. It does emulation well, thanks to my favorite suite RetroArch, plays PC games natively, got first party support for Steam, it has Linux on it, no walled garden, well designed UI, portable (even though I am not a portable guy) and a good price (!). Valve is fast at fixing bugs, listens to the community, adds new features all the time. I can even plug in mouse and keyboard and use it as a full PC for light work. The offline functionality also seems to work good enough. You do not need to be online all the time to play games on it. I love the fact that Valve has an open platform and is not locked down like any other console, plus focus on repair ability by cooperating with iFixit to sell parts.
So, what are the downsides? Obviously it is not perfect. I know, shocker, right? But in all seriousness, there are a few things that need improvement or even are downright annoying. I mentioned already the sometimes loud and annoying fan. Position of L1 and R1 bumpers are not optimal to me too (from ergonomics perspective). And battery will always be an issue on any mobile or handheld device, especially on architecture that plays PC games at that level of power. A version with an OLED+VRR screen could be a game changer for many. Honestly, the screen is fine and acceptable for it’s price range. I miss ability to connect with USB cable, so it would connect as MTP device like my camera or phone. Shared Folders with SMB should be possible too. But these are just minor hiccups.

All in all, I am very impressed with the device and have a lot fun with it. Even if I can play same games on my better PC with higher resolution and fidelity settings, nothing beats a casual play on my bed (now that sounded weird…). Is it a Switch killer? Get outta here! Both systems may share same form factor as a handheld and the market of gaming systems, but they are fundamentally different and appeal to a different class of people. It is like comparing desktop PC to a gaming console like Xbox or Playstation. What we have here is one of the most exciting gaming hardware pieces since a long time.
The Future Is Now!

1 Comment