

Learn and Explore
Once you saw your games through the lens of Shaders, you probably won’t go back to raw pixels. Games look so much more authentic and alive. This is just the beginning of your new journey.
How to Load and Save
To change or use a Shader, open RetroArch and run the game in the core. While the game runs:

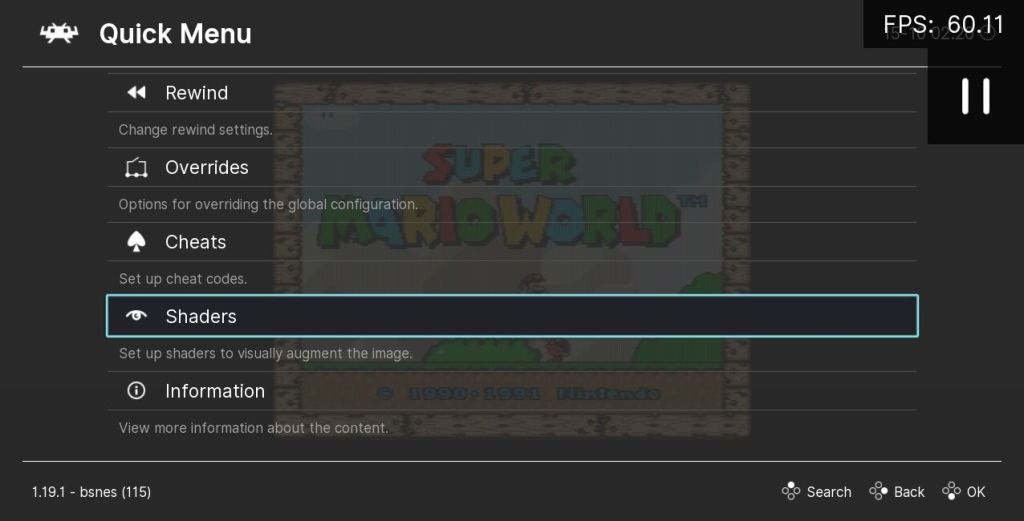
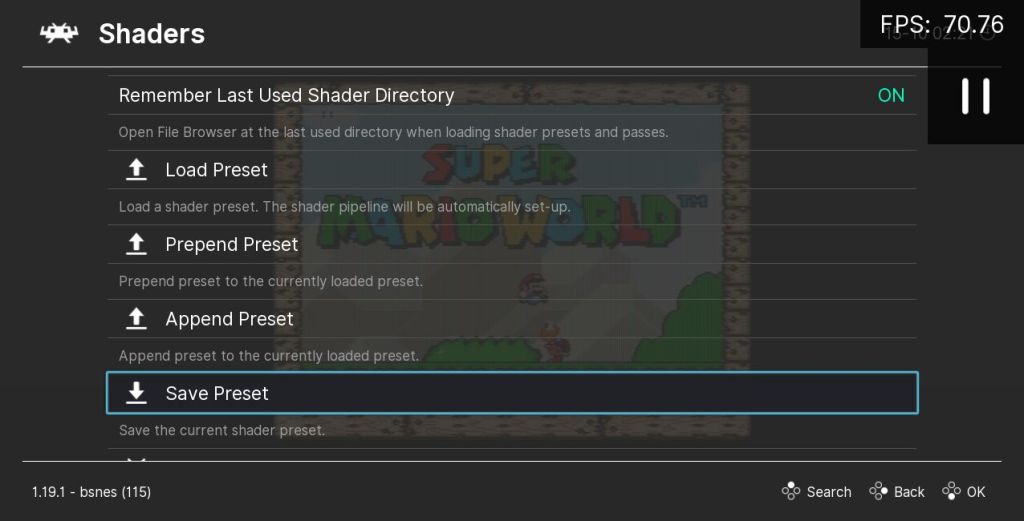
- open the RetroArch menu (on keyboard with F1) to open the quick menu
- scroll down to the “Shaders” submenu
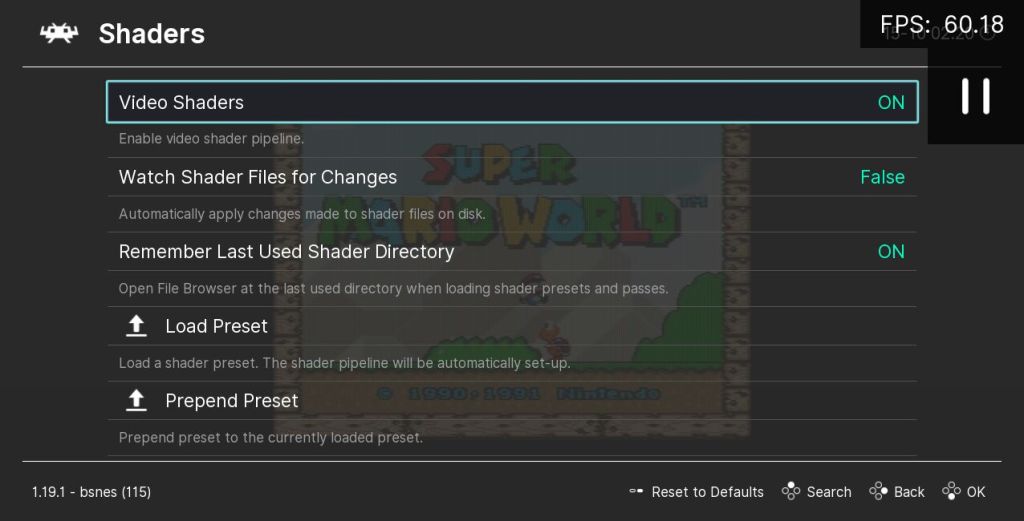
- make sure “Video Shaders” is set to
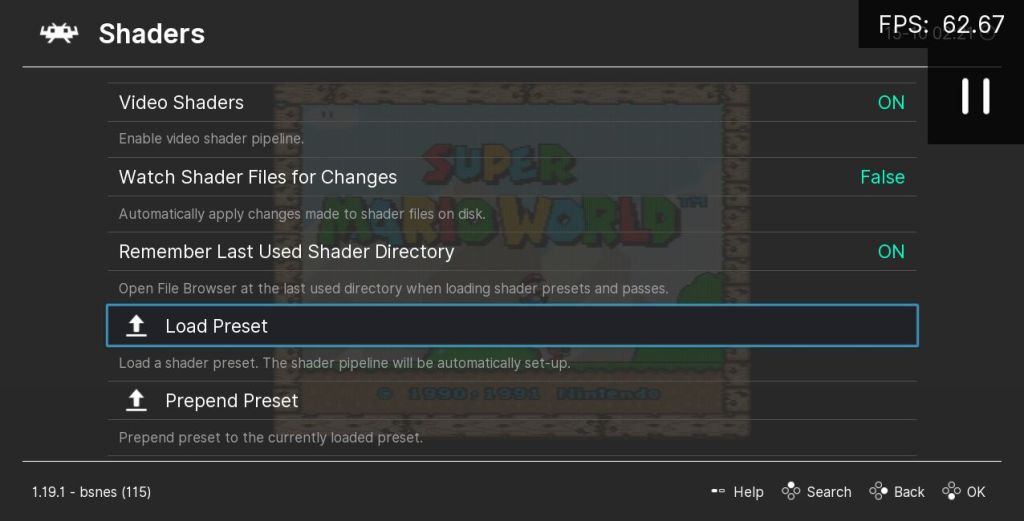
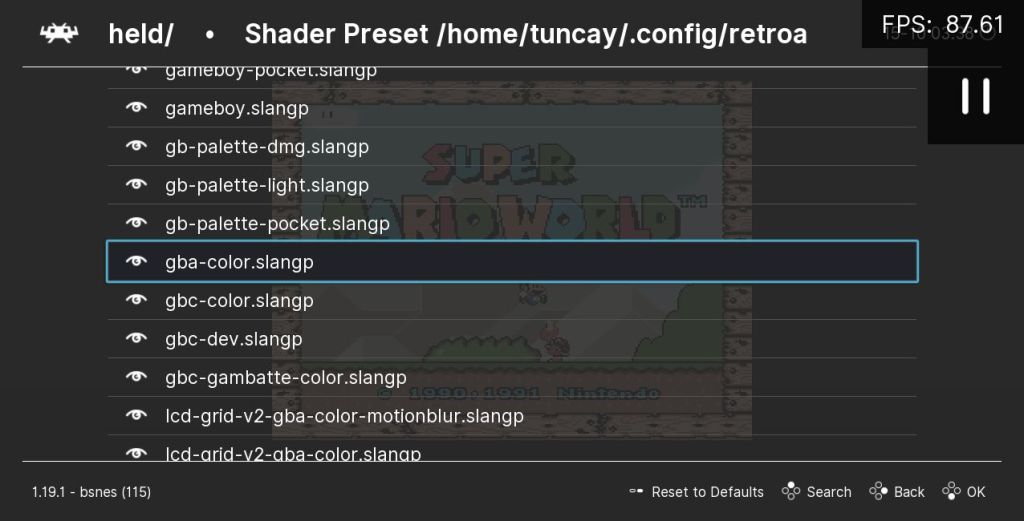
ON, so it is enabled - in the same screen, scroll down and click “Load Preset” to choose one
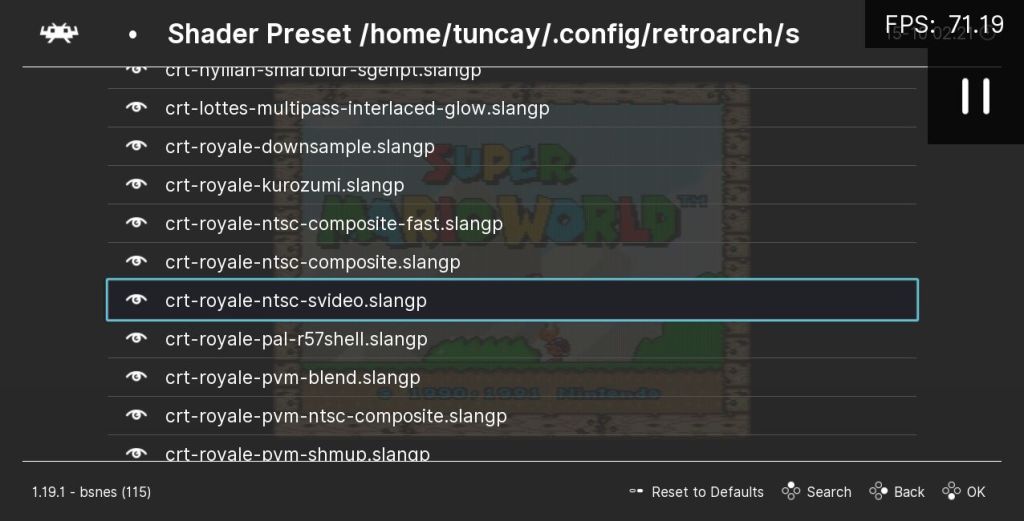
- search the files and select a Shader preset (such as a .slangp file, if you use Slang format), when selected the effect should be immadiately activated
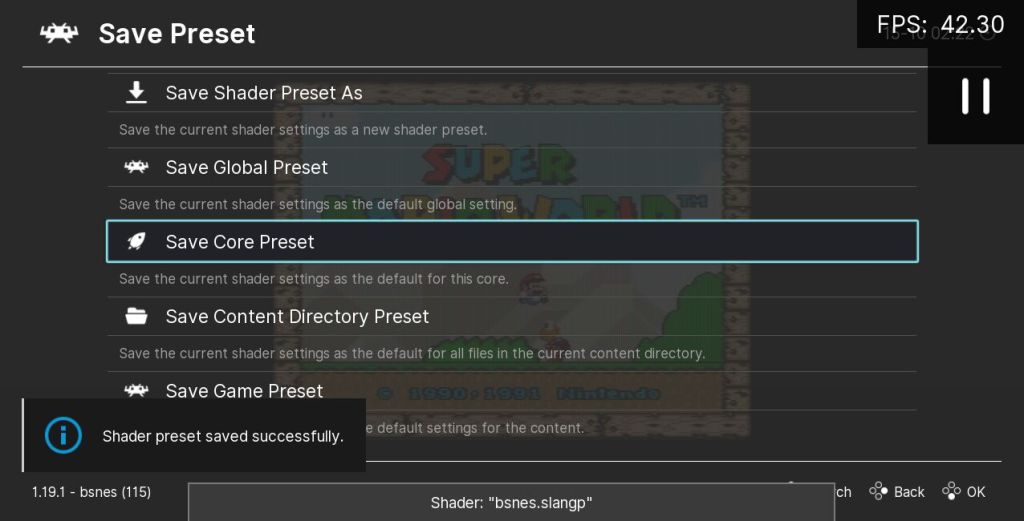
- in the Shaders menu scroll down and click “Save Preset”
- select menu entry “Save Core Preset”, so the current active Shader becomes the new default for the current core permanently, or you can also “Save Global Preset” to make this the default for all cores
Tweak Settings

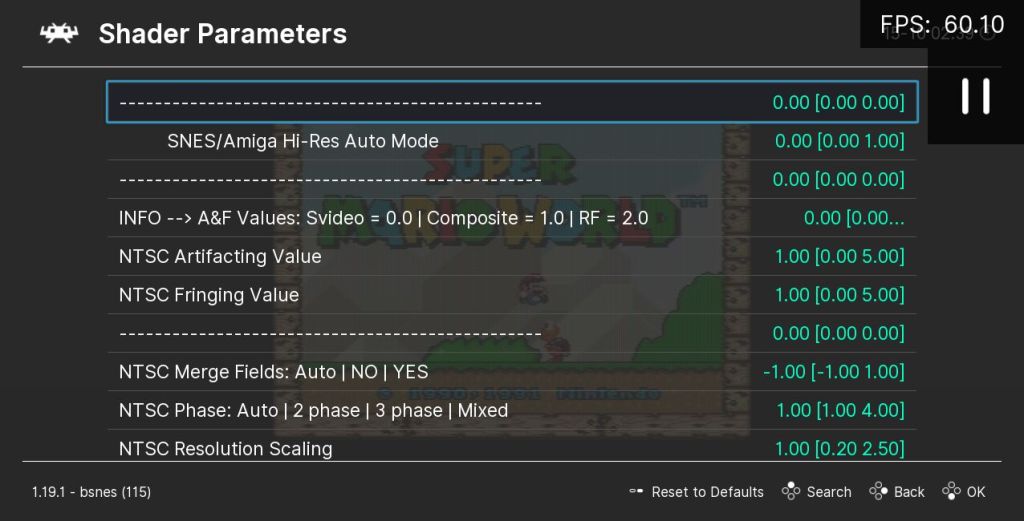


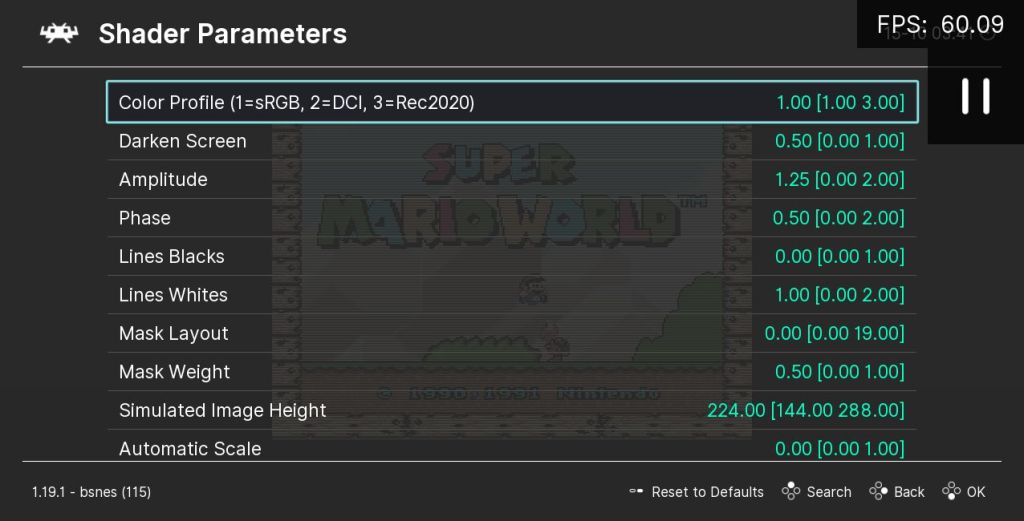
- in the main Shaders menu, scroll down and click “Shader Parameters”
- here are all the settings you can change for the current active Shaders, on the left is the description of the setting and on the right the value of it, depending on the setting each value can have different meaning, such as
1.00could mean “enabled” and0.00could mean “disabled”, or it could have any other meaning - scroll down to whatever setting you want change, in example here “Geometry – Mode”, values on the right
0.00 [0.00 3.00]has following information:- the first
0.00on the left is the current active value - the values in the brackets
[0.00 3.00]is the range of possible values, where the first value in the brackets[0.00means minimum you can select and second value in the brackets3.00]is the maximum you can select
- the first
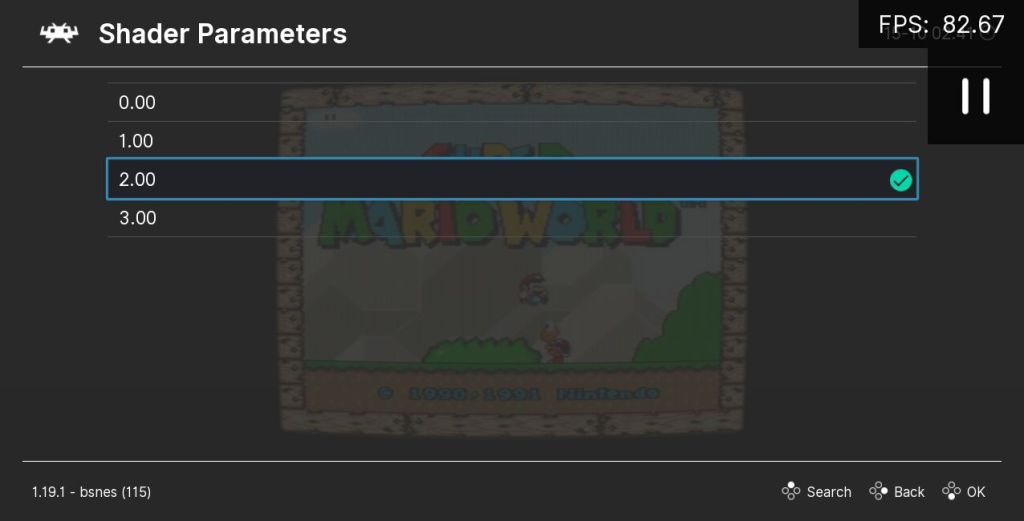
- click with the mouse (or whatever you use) the value to select your custom value, here we chose
2.00to get some curvature, while0.00disables it and makes it flat and all other values are different curvature styles, choose a setting and click with mouse or Enter - back to main Shaders menu, go to the “Save Preset” to save your new configuration like you save any other Shader, in this menu make sure to enable “Simple Presets” to
ON, so the new Shader Preset you are saving will only contain your configuration instead a copy of the entire Shader
In example the “Simple Preset” created Shader Preset file would look like this:
#reference "../../shaders/shaders_slang/presets/crt-royale-ntsc-svideo.slangp"
geom_mode_runtime = "2.000000"
Your customized Shader Preset. All it contains is the path to the Shader it uses and the custom value I set for Geometry Mode. All other values not specified are assumed to be the default.
Combine and Create
So far we only talked about a single Shader Preset. You can also combine multiple Shader files to a new single file. Their effects will be mixed. But not all combinations are compatible or need some tweaking in the settings as explored before. And their order in the list is also important.


- go to main Shaders menu and load the “nearest.slangp” Shader with “Load Preset”, so that only the stock.slang is active now, meaning no special effects as a base, you can verify this in the main Shaders menu scrolling down and looking at the active list
- scroll up to “Append Preset”, this menu point is where we add additional Shaders to combine them, here “Prepend Preset” means it will add to the beginning of the pipeline and “Append Preset” means it will add to the end, choose Append for our excercise
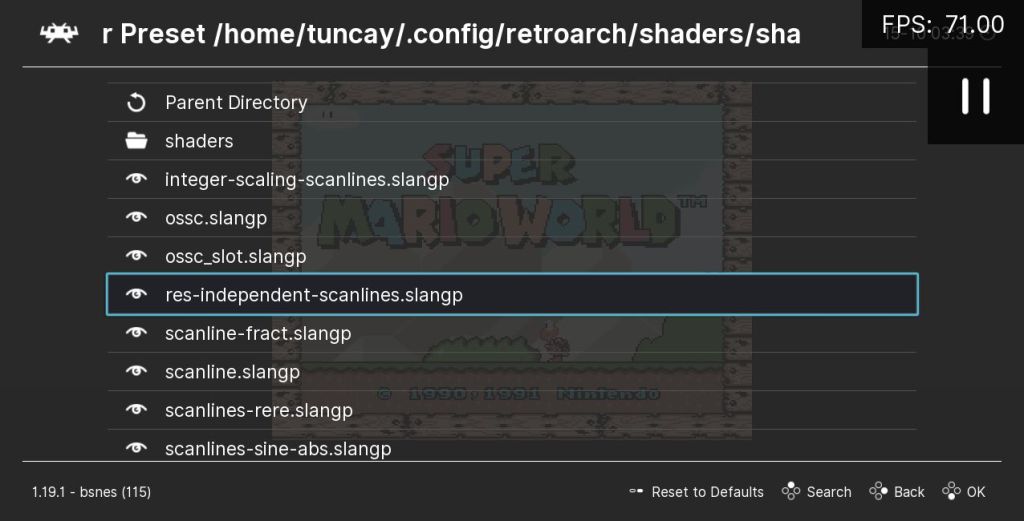
- if you clicked that go and choose a file, here we try a gba-color variant
- click “Append Preset” again and choose another Shader, here we add scanlines
- go to the “Shader Parameters” menu from the main Shaders menu, to make further adjustements, we discussed this before
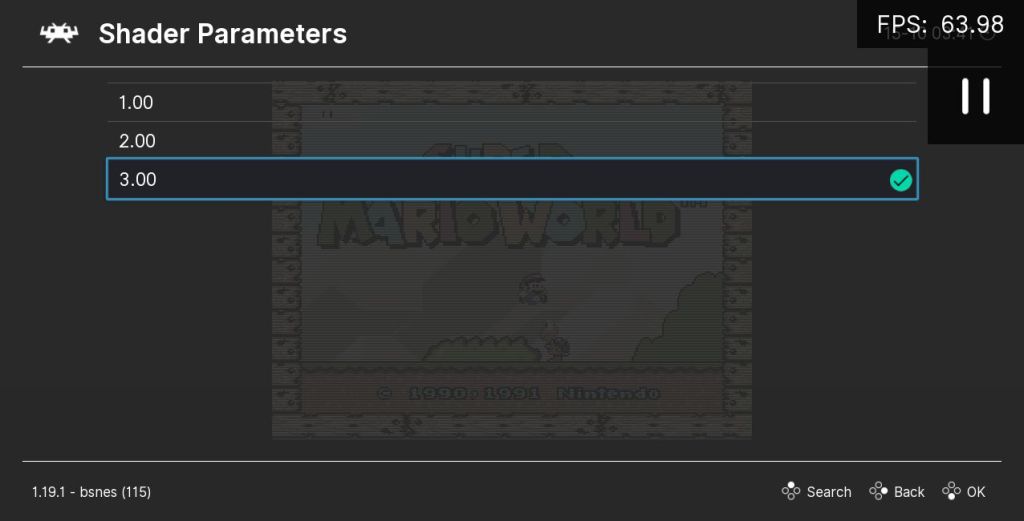
- here we set the “Color Profile” setting from default
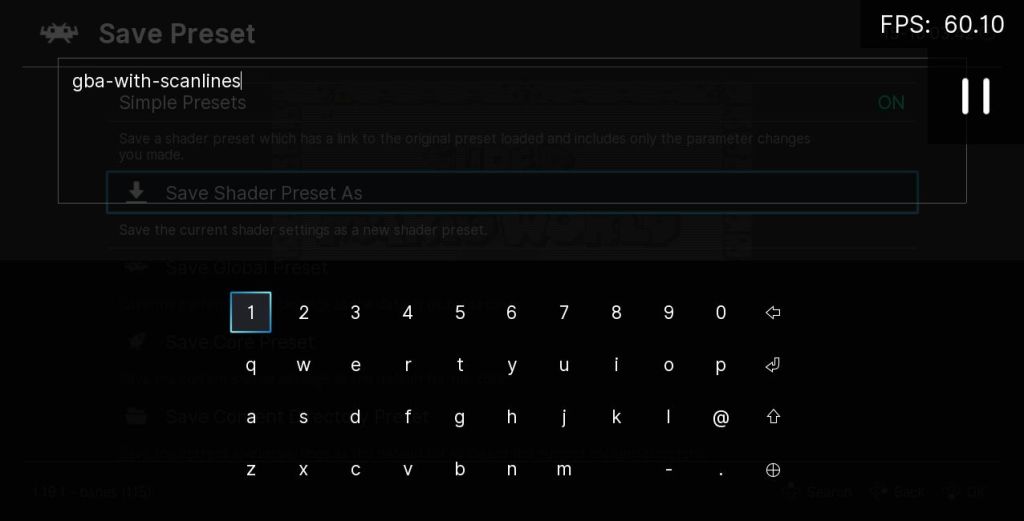
1.00(which stands for sRGB) to our custom value3.00(which stands for Rec2020) - go back to main Shaders menu and go into the “Save Preset” submenu, here choose “Save Shader Preset As” this time
- if you click that, RetroArch will ask for a filename for your new creation, I just chose “gba-with-scanlines” here because it is a combination of both Shaders, if you confirmed a new file with that name is create in the root directory of you Shaders folder in RetroArch
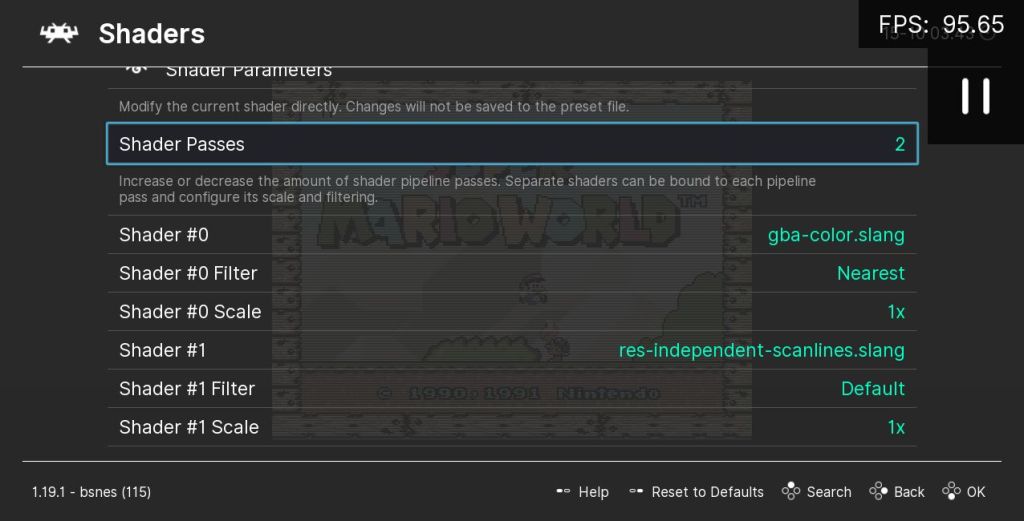
- confirm whats active, by going to main Shaders menu and scrolling down, now you see both names for Shaders and “Shader Passes”
2, as two are active off course, these are simple Presets each consisting of a single Pass, some Shader Presets will add lot of Shader Passes
In example the newly created Shader Preset file “gba-with-scanlines.slangp” would look like this:
shaders = "2"
feedback_pass = "0"
shader0 = "shaders_slang/handheld/shaders/color/gba-color.slang"
filter_linear0 = "false"
wrap_mode0 = "clamp_to_border"
mipmap_input0 = "false"
alias0 = ""
float_framebuffer0 = "false"
srgb_framebuffer0 = "false"
scale_type_x0 = "source"
scale_x0 = "1.000000"
scale_type_y0 = "source"
scale_y0 = "1.000000"
shader1 = "shaders_slang/scanlines/shaders/res-independent-scanlines.slang"
wrap_mode1 = "clamp_to_border"
mipmap_input1 = "false"
alias1 = ""
float_framebuffer1 = "false"
srgb_framebuffer1 = "false"
scale_type_x1 = "viewport"
scale_x1 = "1.000000"
scale_type_y1 = "viewport"
scale_y1 = "1.000000"
mode = "3.000000"
Your personal Shader Preset. Congratulations! This is considerably more complex than our previous Simple Preset, because it contains additional information for each included Shader. I’m not going into details here. You can share your file with others if you want. Unless the file paths are changed here, they have to put the file in the same place as you, the main “shaders” directory.
Default Bezel Presets
Just like you, others in the community share their creations. Some of them make into the official RetroArch standard package. Look in the “shaders” directory of RetroArch, there is a special directory “bezel”, and it contains 2 sub directories: “koko-aio” and “Mega_Bezel”. What are these? Bezels are additional images around the emulation area. These packages are pre-installed, but they require a set of special setup and configuration to work correctly, which is described in their own documentation.
Mega Bezel
Mega Bezel Reflection Shader! – Feedback and Updates by HyperspaceMadness
Hugely configurable family of Shader Presets. Adds borders around the game with realtime screen reflections from actual gameplay to simulate those frames around the CRT. It’s a complete package with ton of options. Build on various Shaders from RetroArch and graphics from project HSM Mega Bezel Graphics and Presets by Duimon.
Koko-aio
Koko-aio shader discussions and updates by kokoko3k
An all in one Shader Preset with many options. A major goal is to run on weaker hardware, while providing visual attractive artworks. Surrounding images are generated with Mega Bezel by HyperspaceMadness, but operates indipendently from that project with its unique implementation.
Community Presets
Community members constantly finetune settings, add new graphics or even improve the Shader algorithms.
These are not included in RetroArch by default. To install them, you need to download the package and follow the instructions for setting up. Basically it involves downloading and unpacking the archives into RetroArch’s “shaders” directory. Exact subfolder location depends on the project; some need a dedicated new folder, others may overwrite existing files. Additional tasks could be required, such as configuration of a specific emulator setting or installing another Community Preset as a dependency. The setup instructions should cover all details, so make sure to read them carefully.
CyberLab Death To Pixels
These are actually 7 multiple distinct projects, each with their own mission. While it includes a set of Bezel package, the main focus are those HDR capable Sony Megatron Color Video Monitor Shader and all sets based on it. System requirements are relatively low, as the monitor is doing the heavy lifting for HDR. Developed for 4k, but suitable for lower output resolution too.
Zomb’s Mega Bezel
Zomb’s Mega Bezel Pack by Zombeaver
Custom bezels for surrounding frames with themes of various platforms. It’s based on Mega Bezel from HyperspaceMadness, which needs to be updated (or a certain version) as well for compatibility. There are multiple versions, optimized for different content and target resolutions and if you prefer curvature or flat look.
Sonkun’s CRT guest advanced hd presets
Ready to use presets available in multiple groups. You first choose type of display: aperture-grille, shadow-mask, slot-mask, then curved-screen or flat-screen look, and then target resolution 1080p, 1440p or 4k. These are all based on newest versions of crt-guest-advanced by guest.r, so you have to update that one too.
Hari’s 1080p Shaders Pack
Hari’s 1080p Shader’s Presets & Screenshots by Hari-82
Package of presets for various use cases focused on 1080p resolution. There are variants with different monitor types, with curvature, tate mode, or edge smoothing to name a few. This set is also based on newest versions of crt-guest-advanced by guest.r, so you have to update that one too.
Hyllian shaders and presets
Hyllian shaders and presets by Hyllian
Collection of multiple Shaders and presets fine tuned for plug ‘n play experience. It mostly (but not only) consists of Shader Presets utilizing Shaders from guest.r, hyllian himself and at 4k also crt-royale. These are categorized in 1080p and 4k target resolutions, then display type aperture-grille, shadow-mask, slot-mask and sometimes pixel-art.
Additional Resources
Discussion
- Comments about this article post on Libretro Forum
- Shaders subforum on Libretro Forum
- shaders search on RetroArch at Reddit
- shaders-and-overlays channel on Libretro at Discord
Documentation
- Shader Library Introduction on Libretro Documentation
- README: Vulkan GLSL RetroArch shader system on libretro/slang-shaders repository at Github
- Shaders and filters on Emulation General Wiki
- Shader Presets on Emulation General Wiki
Blogs
- Guide: Shaders and Overlays on Retro Handhelds by Retro Game Corps
- #Pixel Shader keyword on Filthy Pants: A Computer Blog by Hunter K.
Videos
Videos: 54
Updated: Oct 17, 2024
Or watch with Invidious: https://inv.nadeko.net/playlist?list=PL3amG1g3KoFsRq-NuZYfezrBaW94UqkNI
Platytime: 1:02:10
Published: Sep 6, 2024
Or watch with Invidious: https://inv.nadeko.net/watch?v=2sxKJeYSBmI

What a fantastic series! Have you done a similar series for the NES, Sega Master System, and Sega Genesis/Mega Drive? I would love to see the comparisons between those consoles and emulators of said consoles!
LikeLiked by 1 person
Thank you. Right, the variety on systems (especially handhelds) is something that is missing. I had to limit to a few scenes here, because I made a screenshot for every Shader Preset (690) 4 times for each resolution. With future articles I will focus on more systems rather than covering all Shaders.
LikeLiked by 1 person
Amazing post with everything weel explained!
LikeLiked by 1 person
Very useful post, thank you! Any chance you’ve uploaded the whole picture set somewhere?
LikeLiked by 1 person
At the time of posting, the Internet Archive was broken.
Edit:
Never mind, I finally managed to upload them all to the Internet Archive: https://archive.org/details/showcase_for_retroarch_shaders_2024_screenshot_sets_202504
If you experience slow downloads, using a VPN set to the US might help. That’s because the Internet Archive throttles download and upload speeds to outside the US.
LikeLike